
- Author
- Whyte,Sam
- Subjects
- WWII operations
- Tags
-
- RAN Ships
- HMAS Arunta I, HMAS Warrego I, HMAS Gascoyne I, HMAS Australia II, HMAS Warramunga II
- Publication
- June 1993 edition of the Naval Historical Review (all rights reserved)
THAT DAY AT LINGAYEN (6/1/45) By Captain of HMAS Warramunga – Lt. Cdr. John Alliston
Normally drills and procedures are done in an orderly fashion, one at a time. Not so at Lingayen … with the BROOKS affair everything happened at once.
While the gun’s crews were fending off the kamikazes the damage control parties were desperately dealing with the fires that came close to BROOKS’S magazines. The communicators and radar crews were our insurance against being surprised by the opposition and the vital task of sending out enemy reports and calls for air action.
Our good Dr. Begg and two SBAs, plus help from volunteers, had terribly wounded and burnt men to handle.
No. 1, Herbie Gunns, and the Buffer rounded up enough hands to pass the tow from aft to BROOKS’S foc’sle and connect it to her cable. All the time the E.R. had steam in three boilers and never knew from one moment to the next whether I was going to ring down 30 knots or full astern.
Somehow the cooks fed us and looked after the crew of BROOKS as they came aboard, perhaps 100 of them.
I am proud to say that WARRAMUNGA’S young crew worked swiftly and efficiently – veterans in experience if not in age.
Early in the heat of the Leyte Gulf Invasion, WARRAMUNGA steamed through the Surigao Strait on the 3rd January, 1945 as part of the Task Force 77.2 under command of Admiral Olendorf U.S.N.
Soon after 1700 on the 4th, the group was attacked by enemy aircraft. WARRAMUNGA opened fire and made several emergency turns to avoid being hit. An enemy dive bomber crashed onto the flight deck of the USS OMMANEY BAY, causing several fires in the hangars. These fires became uncontrollable, so the ship had to be abandoned and sunk. On the 5th at 1645 the group was attacked again by a force of between 50 and 60 Kamikaze aircraft and continued for 2½ hours, during which time 7 ships were hit and damaged. Two were Australian, the AUSTRALIA and ARUNTA.
On the 6th WARRAMUNGA went to dawn action stations and stayed there for over 10 hours. She had been allocated to give fire support to the minesweepers inside the Gulf, so at 0730 she left the main group. She was immediately picked out by 3 enemy aircraft. The first dived at the starboard bow and the guns crews opened fire. It turned away out of control. With the second plane approaching from astern, it released two bombs which exploded near the starboard side. The third was attacked by U.S. fighter aircraft and shot down. The Task Group Commander recalled WARRAMUNGA to the safety of the group. WARRAMUNGA requested permission to try and once again proceed into the Gulf and with permission granted she took station astern of USS BROOKS and HUMPHRIES who were carrying on with their task of sweeping. At 1145, two enemy planes appeared coming in from the hills at great speed and barely above the water.
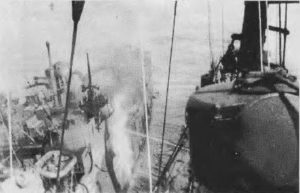
WARRAMUNGA’S guns came to bear and opened fire. One plane came through the bursting shells and appeared almost surely to hit her. At about 1000 yards it suddenly veered and passing across her bow crashed into the BROOKS. Fire enveloped the stricken ship. WARRAMUNGA slowed and turned to render assistance. She went alongside at 1305 and damage control parties got to work in putting out the blaze. One fire was close to the 3 inch magazine and it was essential that this be contained. Eight of her fire hoses were played onto the area. By this time BROOK’S side was red hot. Wounded crew were transferred to WARRAMUNGA’S sick bay as she prepared to take BROOKS in tow. The fires took about an hour to bring under control. The tow was then secured and the two ships got under way at 1345, making about 8 knots, sitting ducks for the enemy if they should come their way. Close support was given to them by WARREGO and GASCOYNE. It was decided that GASCOYNE should take over the tow at 1545 but this proved impossible so they continued on their way. Enemy aircraft attacked again at 1625 but were driven off by accurate gunfire and one was later seen crashing into the sea. Further attacks continued until 1815 and at 1850 it was recorded in the ship’s log “Sunset, thank God for that”. Action stations were secured at 1939.