
- Author
- McDonald, I.H., Captain, RAN (Ret)
- Subjects
- Biographies and personal histories, WWII operations
- Tags
-
- RAN Ships
- None noted.
- Publication
- June 1991 edition of the Naval Historical Review (all rights reserved)
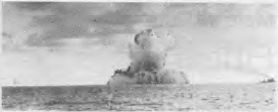
VALIANT and WARSPITE in background.
It is just over 49 years since H.M.S. BARHAM was torpedoed by U.331 and lost off the Western Desert of Egypt – off Sollum and Sidi Barrani. She was the flagship of the 1st Battle Squadron and of the Second in Command of the Mediterranean Fleet, 1941. U.331 was under the command of Freiherr Diedrich von Tiesenhausen who was a lieutenant of 26 years of age.
I was in H.M.S. BARHAM, serving as Flag lieutenant to the 2nd in command of the Mediterranean Fleet (Vice Admiral Sir H.D. Pridham-Wippell), and Squadron Signal Officer of the 1st Battle Squadron.
This is my first written account of the fateful day, and of my recollections of some of the circumstances before and after the catastrophe since I prepared a Report on the sinking shortly after the event for the Royal Naval Authorities at Alexandria, Egypt. However, I can vividly recall the sinking as though it were yesterday.
BARHAM was an “old timer” of the QUEEN ELIZABETH class, and a veteran of the Battle of Jutland. She started off World War II by being torpedoed off Liverpool, and after being patched up was in trouble again during a bombardment of Oran, when she was hit by Free French shore batteries. On her arrival at Alexandria shortly afterwards, my Admiral (P-W) and I joined her when she took over from ROYAL SOVEREIGN as flagship of the 1st Battle Squadron,
During the next eighteen months or so, the 1st B.S. flag changed on a number of occasions. P.W and staff moved to MALAYA and QUEEN ELIZABETH, and Rear Admiral B.S. Rawlings took over temporarily from P-W who became Vice Admiral Light Forces. During this time BARHAM was bombed and severely damaged by the Luftwaffe and had to go to Capetown for extensive repairs. On her return I teamed up with P-W again when he shifted his flag back to the, Battleships.
Towards the end of 1941, the Med Fleet was experiencing some ups and downs, as the Luftwaffe became increasingly active and aggressive during the advance of General Rommel (the ‘Desert Fox’) and his Afrika Korps across the Western Desert towards Alexandria.
During the third week in November, 1941, there was evidence that two convoys were being despatched from Italy to Benghazi to reinforce the Africa Korps. Our C. in C. (Admiral Sir Andrew Cunningham) ordered the 7th and 15th Cruiser Squadrons to sea to attempt to intercept and destroy these convoys.
Late in the afternoon of November 24, 1941 WARSPITE, (C. in C.), BARHAM and VALIANT and a screen of nine destroyers sailed from Alexandria to provide heavy gun cover for the Cruisers.
After the battle fleet left Alexandria all was uneventful, and during the early afternoon of 25th November, course was reversed, and the Force proceeded back towards ‘Alex’. Earlier in the day there had been a couple of Air Raid warnings, and reports of enemy aircraft ‘Shadowers’, but nothing of particular consequence. It was a perfect day and the sea was smooth, After Hands had been piped ‘to tea’, the usual promenaders (ERAs and Stoker POs off watch) emerged from below-decks for their customary first Dog Watch strolls up and down the Foc’sle.
Shortly after 4.00 pm I was on the Admiral’s Bridge. The S.G.O (Cdr. Guy Morris), S.O.O./S.N.O. (Cdr. Craske), the Admiral and S.W.O. (Lt. Cdr. Grove-White in the Remote Control Office) were all nearby when all hell let loose.
The ship had been hit amidships by torpedoes on the port side. It was steaming at about twenty knots at the time, and immediately began to list to port at an alarming rate. All electric motors had stopped, all power had gone ‘off the Board’, there was an ominous creaking of Bridge work and Rigging, the ship was ‘dead’ and it was clear to all of us that it was every man for himself while the going was good. The torpedoes seemed to hit the ship amidships just abaft the funnel, judging by the waterspout in that general area, of which I had a ringside view from the Admiral’s Bridge. Before leaving the Bridge to make my attempt to escape, the conning tower of a submarine surfaced about one hundred and fifty yards from the port side, and remained exposed for perhaps half a minute before the U boat dived again. I assumed that this had happened because the submarine Captain had fired all his bow tubes at once, and had not compensated quickly enough with seawater to keep the conning tower below the surface.