• Skip to primary navigation
  • Skip to main content
  • Skip to primary sidebar

Naval Historical Society of Australia

Preserving Australia's Naval History

  • Events
  • Account
  • Members Area
  • Volunteer
  • Donate
  • Contact us
  • Show Search
  • 0 items
Hide Search
Menu
  • Home
  • Research
    • Where to start
      • Research – We can help!
      • Self help
      • Naval Service Records
      • Library
      • Related Maritime websites
    • Resources
      • Articles
      • Videos
      • On This Day
      • Podcasts
      • Australian Military Ship Losses
      • RAN events on a  Google Earth Map
      • RAN Vessels – Where are they now?
      • Related Maritime websites
    • Other
      • Newsletters: Call The Hands
      • Occasional Papers and Historical Booklets
      • Books
      • HMAS Shropshire
      • Book reviews
    • Close
  • Naval Heritage Sites
    • World Heritage Listings
      • Cockatoo Island
    • National Heritage Listings
      • HMAS Sydney II and the HSK Kormoran Shipwreck Sites
      • HMVS Cerberus
    • Commonwealth Heritage Listings
      • Garden Island NSW
      • HMAS Watson
      • HMAS Penguin
      • Spectacle Island Explosives Complex NSW
      • Chowder Bay Naval Facilities
      • Beecroft Peninsula NSW
      • Admiralty House, Garden and Fortifications
      • HMAS Cerberus
      • Naval Offices QLD
      • Garden Island WA
      • Royal Australian Naval College ACT
      • Royal Australian Naval Transmitting Station ACT
    • NSW Heritage Listings
      • HMAS Rushcutter
    • Close
  • Naval Art
  • Tours & Cruises
    • Navy in Sydney Harbour Cruise, East
    • Navy in Sydney Harbour Cruise, West
    • Anniversary Cruise: Sydney under Japanese Attack
    • Tour Bookings
    • Close
  • About us
    • About Us
      • What we do
      • Our People
      • Office Bearers
      • Become a volunteer
      • Our Goals and Strategy
    • Organisation
      • Victoria Chapter
      • WA Chapter
      • ACT Chapter
    • Close
  • Membership
  • Shop
  • Become a volunteer
  • Donate
You are here: Home / Article topics / Publications / Naval Historical Review / Navy Blue Anzacs – The RAN in the 1915 Gallipoli Campaign

Navy Blue Anzacs – The RAN in the 1915 Gallipoli Campaign

Swinden, Greg · Mar 2, 1996 · Print This Page

Author
Swinden, Greg
Subjects
WWI operations
Tags
RAN Bridging Train, Gallipoli, Dardanelles, TGC Sultan Hissar
RAN Ships
HMAS AE2
Publication
March 1996 edition of the Naval Historical Review (all rights reserved)
A.B. Driver Ben Thompson of the RAN Bridging Train - Note the Light Horse uniform with Anchor Badges
A.B. Driver Ben Thompson of the RAN Bridging Train – Note the Light Horse uniform with Anchor Badges

Mention Gallipoli to any Australian and they will immediately think of bronzed ANZACs storming ashore at ANZAC Cove on 25th April 1915, Simpson and his donkey evacuating wounded, or the heavy fighting at the Battles of Lone Pine or the Nek. Few, if any think of the RAN’s small but significant role in this campaign.

The RAN had two units involved in the Gallipoli campaign. These were the submarine AE2 and the Royal Australian Naval Bridging Train (RANBT). Both served with distinction and ironically the AE2 was the first Australian unit to go into action at Gallipoli and the RANBT the last Australian unit to leave the Peninsula.

Submarine AE2
Submarine AE2

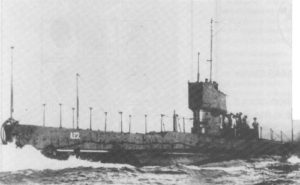
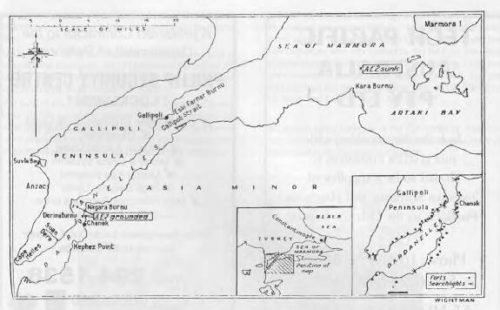
On 24 April the Australian submarine AE2 under Lieutenant Commander H.H.G.D. Stoker RN was ordered to penetrate the Dardanelles, a narrow heavily mined strip of water separating the Gallipoli peninsula from the rest of Turkey. Stoker’s orders were to create havoc behind the Turkish lines whilst the ANZACs were landing, and “to run amok generally”. Although AE2’s officers and senior sailors were on loan from the Royal Navy the majority of her crew were Australian born.

At 0230 on the 25th AE2 began her approach to the Dardanelles and after several tense hours Submarine AE2 including being fired at by Turkish shore batteries and snagging the mooring wires of several mines the AE2 made it through to the sea of Marmara, thus becoming the first Allied submarine to breach Turkish defences.

AE2 began to run amok generally and fire her torpedoes at a variety of targets. At one point a Turkish battleship was bombarding ANZAC positions when AE2’s periscope was sighted approaching the ship. The Turkish ship ceased firing and ran for safety just at the time its shelling was becoming most effective. Meanwhile ashore on the peninsula things were not going to plan. The Turkish defence was particularly strong, the Australians had suffered heavy casualties and many troops were lost or disorganised. Serious consideration was being given to evacuating the ANZACs.

The course of AE2
The course of AE2

The British Commander General Hamilton was considering the potential evacuation when news of AE2’s penetration of the Dardanelles was received. Hamilton immediately discarded all thought of evacuation and immediately sent the following signal to the troops ashore: “Your news is indeed serious, but dig yourself in and stick it out. It would take at least two days to re-embark you. Meanwhile the Australian submarine has got through the Narrows and torpedoed a Gunboat at Chanak. Make an appeal to your men to make the supreme effort to hold their ground. You have got through the difficult business. Now all you have to do is dig, dig, dig until you are safe.”

What could have been a short three day raid became an eight month campaign and cost over 8000 Australian lives. If not for AE2’s actions it is highly likely that the ANZACs would have been evacuated and the legend of Gallipoli would have been stillborn.

AE2 continued her attacks on Turkish ships but on 30 April was attacked and sunk by the Turkish torpedo boat Sultan Hissar. Her crew of 32 survived the sinking, however, all were taken prisoner. During the next three years of captivity four men from AE2 died from disease and ill treatment.

Although the RAN’s presence at Gallipoli had ended with the loss of AE2, it was not to be long before it was back in a role that was just as unlikely and just as unexpected.

RAN Bridging Train - Staff , Melboume April 1915 (Note the cap Badges)
RAN Bridging Train – Staff , Melboume April 1915 (Note the cap Badges)

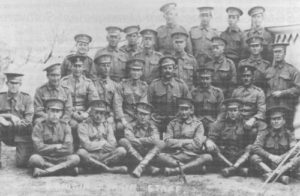
The Royal Australian Naval Bridging Train was formed in Melbourne in February 1915 under the command of Lieutenant Commander Leighton Seymour Bracegirdle (later Rear Admiral Bracegirdle).

The Bridging Train consisted mainly of Naval Reservists who could not be employed in RAN warships. They wore Light Horse uniforms but with anchor badges replacing the Army rising sun badges and Naval badges of rank. The Bridging Train was organised as a horse drawn engineering unit and it was originally planned they would serve on the Western Front in France with the British Army. Like their ANZAC cousins they were diverted to the Mediterranean theatre of war.

Pages: Page 1 Page 2

Naval Historical Review, WWI operations RAN Bridging Train, Gallipoli, Dardanelles, TGC Sultan Hissar

Primary Sidebar

SUBSCRIBE

Sign up for our monthly e-newsletter.

  • This field is for validation purposes and should be left unchanged.

Categories

Latest Podcasts

  • The Fall of Singapore
  • HMAS Armidale
  • Napoleon, the Royal Navy and Me
  • The Case of the Unknown Sailor
  • Night of the midget subs — Sydney under attack

Links to other podcasts

Australian Naval History Podcasts
This podcast series examines Australia’s Naval history, featuring a variety of naval history experts from the Naval Studies Group and elsewhere.
Produced by the Naval Studies Group in conjunction with the Submarine Institute of Australia, the Australian Naval Institute, Naval Historical Society and the RAN Seapower Centre

Life on the Line Podcasts
Life on the Line tracks down Australian war veterans and records their stories.
These recordings can be accessed through Apple iTunes or for Android users, Stitcher.

Video Links

  • Australian War Memorial YouTube channel
  • Royal Australian Navy YouTube Channel
  • Research – We can help!
  • Naval Heritage Sites
  • Explore Naval Art
  • Dockyard Heritage Tour
  • About us
  • Shop
  • Events
  • Members Area
  • Volunteer
  • Donate
  • Contact us

Follow us

  • Facebook
  • YouTube
  • Members Area
  • Privacy Policy

Naval Historical Society of Australia Inc. Copyright © 2025