- Author
- Hordern, Marsden
- Subjects
- WWII operations
- Tags
-
- RAN Ships
- None noted.
- Publication
- June 1993 edition of the Naval Historical Review (all rights reserved)
Outside Rabaul’s Harbour, Rear Admiral Shofuku Kimura looked from the bridge of his flagship at a grey sea and a leaden sky. He hoped it would stay that way. Bad weather had shrouded the Bismarck Sea with poor visibility, and if it continued like that it could mean the difference between success and failure. The Imperial Army in New Guinea had just been defeated in bloody battles for Buna and Gona and needed reinforcement. Over six thousand soldiers and four hundred elite marines were to be landed at Lae from the seven transports, TEIYO MARU, KEMBU MARU, SHIN-AI-MARU, AIYO MARU, OIGAWA MARU, TAIMEI MARU, KYOKUSEI MARU, and the supply ship NOJIMA crammed with stores and equipment. The KEMBU MARU carried a full load of petrol to fuel an air offensive against the Australians and Americans in New Guinea.
Although the marus could only manage seven knots they were not to sail defenceless. Each transport was to have a destroyer to protect it. The third Destroyer Flotilla of the Imperial Japanese Navy had been given that honour and the 253rd Air Group promised the powerful support of between thirty and forty fighters patrolling overhead constantly in daylight hours. The convoy’s route from Rabaul was to be west along the north coast of New Britain to Cape Gloucester, then south through the Vitiaz Strait into the Huon Gulf to Lae.
Kimura, wearing his flag in the destroyer SHIRAYUKI was accompanied by her seven sisters ASASHIO, TOKITSUKAZE, YUKIKAZE, URANAMI, SHIKINAMI, ARASHIO and ASAGUMO. For four of them Simpson Harbour was to be the port of no return and not one of their charges would see the lights of shore again. In some of its other daring sorties the Imperial Japanese Navy had been favoured by weather, but this time in the Bismarck Sea its luck ran out.
Allied intelligence knew that the Japanese would try to reinforce their army after their land losses in the fighting at Buna and Gona and towards the end of February American B24 Liberators were on watch over the waters of the Bismarck Sea.
Until 1 March the thick weather protected Kimura, but then the searching planes reported it to be clearing and that afternoon the navigator of a B24 looking down on the sea through a rift in the clouds saw something which quickened his pulse – Kimura and his convoy crawling towards Lae. Above them circled an umbrella of Zeros.
To attack these ships the allies had about eighty-six bombers and one hundred fighters, but Kimura’s luck returned with more murky weather, and the convoy was lost again. Nothing appeared below the searching airmen but wave crests on a sombre sea.
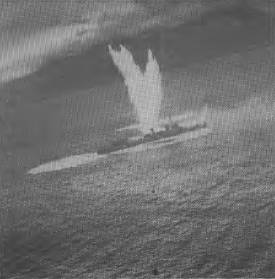
This graphic shot is believed to have been taken by the famed Damien Parer.
On the afternoon of 2 March the sky cleared and this time Kimura’s luck ran out for good. Twelve B-17 U.S. Air Force Flying Fortresses and seventeen other bombers rained down thousand pound bombs on the ships. They sank the KYOKUSEI MARU, but before she went the destroyers ASAGUMO and YUKIKAZE rescued eight hundred and fifty of the troops on board. They then made a high speed dash to Lae, landed the soldiers and rejoined the convoy next morning. These were the only men to be delivered to their destination by any of the ships that had sailed from Rabaul to take them to Lae. The exuberant American crews reported that four ships bad been sunk or left sinking. Later in the day another wave of attacking Fortresses reported more hits and the shooting down of a Zero. These reports were exaggerated, but a telling blow had been struck against the Japanese. The convoy was kept under continuous watch, and during the coming night the RAAF began to play its part. One of its Catalina flying boats lumbering along at about one hundred knots spotted the convoy illuminated by a shaft of moonlight slanting down between the clouds. The Catalina could not do much to harm the Japanese but it disturbed their sleep, lowered their morale, and frayed their nerves by dropping flares and random bombs to keep them all on edge.
If, that night, Kimura thought about ordering the convoy to scatter and make its way by different routes back to the safety of Rabaul or Kavieng in New Ireland, he did nothing. At 4 am on 3 March, eight torpedo-bombers, Beauforts of 100 Squadron RAAF, lifted into a dirty sky, and flew north to attack the enemy. Only two found the convoy, one torpedo missed and the other hung up in the Beaufort’s bomb bay.