
- Author
- Bastock, John
- Subjects
- Early warships, Ship histories and stories, History - WW1, Cruisers
- Tags
-
- RAN Ships
- HMAS Australia I, HMAS Sydney I, HMAS Melbourne I
- Publication
- June 2025 edition of the Naval Historical Review (all rights reserved)
A transcript of the 1972 presentation to the NHSA by naval historian and member John Bastock
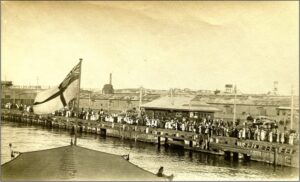
When the first Australian Fleet Unit arrived in Sydney on 4 October 1913, I had a fairly good view of the events because I was taken down as a small boy to the site close to the Opera House and near to Man o’ War steps.
And as it appeared that there must have been at least half the population of Sydney present, I prevailed upon my father to sit me on his shoulder, which he did, and so I had a fine view of the entry of our fleet. Everyone, of course, was impressed with the great battlecruiser HMAS Australia, which was the flagship of the new fleet. But as a young boy, I must confess, like all other youngsters, that I was most impressed with the sleek light cruisers which laid between Australia and Garden Island, Numbers 2 and 3 buoys, which we used to call them then. Number 2 was halfway between Bennelong Point and Mrs. Macquarie’s chair, and Number 3 was right off Mrs. Macquarie’s chair.
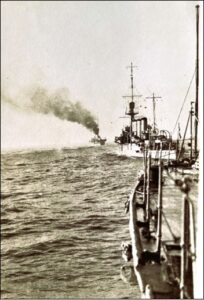
Now to see these ‘four-funnellers,’ HMA Ships Sydney and Melbourne, belching forth their smoke, I was extremely impressed.

Little did I think at the time, as a lad, that one day, some years later, I would be serving in these two ships, and not only in these two, but also in their young sister, Brisbane, which at that point of time was just barely taking shape on the stocks of Cockatoo Island. She wasn’t due in the water for another two-years after that.
And so, I’d like to tell you something tonight about these four-funnel cruisers. Now these three, Sydney,Melbourne and Brisbane, where the first cruisers built for the RAN. They were built to the design of the Chatham group of the British Town class light cruisers which were constructed before the Great War.

Intended as a counter to the large number of German cruisers coming into service, they were nice little vessels, very handsome ships I thought, with their raking masts and funnels, cut-away bow and over-hanging stern. They looked tough, particularly when belching all that smoke, but we thought they looked all right at that time. In the Chatham group, to which this little part belonged, the forecastle of the ship was taken right aft, nearly to the mainmast, and on that level, five of the eight six-inch guns were carried.
Design
In earlier classes of British ships, one of the weaknesses in design was that the forecastle was broken at the point near the bridge and run up. And at that time, the principle of putting all the guns on the centreline of the ship, to fire on each side, hadn’t been fully developed. Thus, much of the main armament had to be carried on the sides of the ship.
And you can imagine, at this level, guns fitted on the side of the ship would be fairly low in command, and not only that, they would be washed out in any sort of a sea running from the bows right down to the beam. And not only was this uncomfortable for the gun crews, because they would practically have to hang on for life when each ‘green-back’ washed over the ship, but there was a more genuine problem as well.
The armament of these ships at this time was made up of separate ammunition. That is, the 6-inch shell was separate to the charge. The shell was put into the gun first, followed by a cordite charge. On each end of the cordite charge was a little powder bag, a bag of gunpowder. And you all know the adage, keep your powder dry!
Well, with ‘green-backs’ washing over the ship, it was hard to keep your powder dry, and the result would be a missed fire, because you can’t light, or you can’t ignite wet powder.
Class data
Now, for a bit of an in-depth look at this Chatham group of ships. They were of 5,400 tons displacement. That is about 800 tons heavier than our present (Perth class) guided missile destroyers, which, for the sake of people not conversed with Navy jargon, we call those the DDGs. Their overall length was 457 feet, so the cruisers were about 20-feet longer than the DDGs.
That doesn’t seem very much, but these ships did look much bigger than our present DDGs, which are a very handsome ship, but more like they are, in fact a big destroyer. But these Chatham class units look every inch a fighting ship and a cruiser.
They were well armed for their size. The 6-inch, 50-calibre guns fired a shell weighing 100-pounds. And that was the heaviest hand-loaded shell in the British naval services at the time. As a secondary armament, they carried four 3-pounder guns.
As the secondary armament, I would suspect that they were actually second-hand guns. And I also believe that they would have been useless against anything that they fired against. But they had a couple of effective uses. One was for frightening the heck out of residents in the case of any troubles ashore. And, of course, their primary purpose in these RAN ships was for saluting.
And not only that, but this little three-pounder was also the ship’s star-shell gun. That is, it illuminated the target with star-shell. It was found very early in the Great War, that as soon as you switched your searchlights on, particularly if you did them at both ends of the ship, you were a sitting duck.
So, the lesson was quickly learned, that you don’t switch your lights on if the lookout picked up a suspected enemy, you fire a star-shell to illuminate it with a sickly yellow pyrotechnic display. And, as well, the little guns made a dreadful noise.
Engines
The cruisers were powered by turbines, not geared turbines, but direct drive Parsons turbines. And their horsepower was 25,000. Maximum speed, or design speed rather, was 25 and a half knots.
But by stoking them up a little, with a little ‘blood, sweat and tears’, another knot could be extracted from them in those conditions. They were four-screwed vessels, although their later sister Adelaide, only had two.
Torpedoes
Another important part of the armament were the torpedoes. They had two 21-inch submerged torpedo tubes, with the starboard tube placed a little further forward than the port tube, because the beam of the ship was narrow, 50-feet, and you couldn’t put two tubes end to end. So they were staggered, the starboard tube being the foremost of the two.
It had been claimed up to about this period that submerged torpedo tubes were a great idea because the enemy could not see you firing at it. Well, that was true, but this was not always an advantage, because at some stage, and this was found to be vital, particularly during the Second World War, as well as the Great War, but you wanted the enemy to see you firing torpedoes at him. Because as soon as you let loose with torpedoes, he had to take some evasive action.
Another great disadvantage was, if you imagine the ship slipping through the water at about 20-knots and firing a torpedo, measuring about 25-feet in length, before it got halfway through, the torpedo would snap off like a carrot. And this was a great disadvantage. To fix the problem, the RAN installed a very heavy thing called a ‘bar’. And this heavy fitting had to be run out before the torpedoes, and thus protected the torpedo until it got clear of the tube. And that was the way the problem was overcome.
But the underwater torpedo installation was a messy business. These ships carried an outfit of about eight or nine torpedoes. And it was a very strenuous task, loading these heavy weapons. It required a great number of interlocks on the tube for safety purposes because there had to be a front door to keep the water out while you loaded your torpedo. And there was a side door on the torpedo tube and a rear door. You had to close the front door. You had to open the rear and side doors.
And then close them up again before the front door was open, and before you fired the torpedoes, you must know that the bar was run out. And in any case, by the time you’ve fired about half a dozen torpedoes, as well as being exhausted, you would be up to your knees in salt water, which had to be pumped out again. So, it was a bit of a messy business all round.
Saluting
In those early days, everything was very unsophisticated, with a nice timing to the salute. Some of the older personnel here tonight will remember this routine: the gunner’s mate used to stand on the platform adjacent to them, and when the order was given to let fire for the Royal Salute, he would say, Fire one, if I wasn’t a gunner, I wouldn’t be here. Fire two, if I wasn’t a gunner, I wouldn’t be here. Fire three, and so forth. And that sounded particularly good. It was very nicely spaced. And that’s the way they got over the spacing of their royal salute and all those types of things.
Three-pounders
It’s interesting to note that when these cruisers were first commissioned and arrived in Sydney Harbour, no provision had been made for fighting aircraft or for attacking enemy submarines.
My Lords of the Admiralty at that time evidently thought that the aircraft was just a toy, and the submarine as well. But they were, of course, a few years later to learn the lesson in a hard way. So, the ships were eventually armed with their four 3-pounder guns, aft of the fourth stack, as a defender against aircraft.